11 minutes
Private (Cloud) Fronts
The Introduction
The idea for this post came about when the same content challenge popped up three times in the same week; namely, how would I secure a CloudFront distribution in a purely serverless way? And by serverless, I mean where I am paying for ad-hoc requests instead of fixed-hourly compute costs.
For the curious, the three challenges were:
- Protecting a preview version of my website for sharing with the inner circle.
- Protecting an internal development team’s wiki.
- Protecting an operation team’s incident runbooks and incident playbooks.
In every case, the content was captured in Markdown, stored in a Git repository and then converted into a static website before deployment.
Naively, I expected to write up some code, slap together a blog post and have it running and published within a few weeks. Oh boy, was I wrong!
Basic Requirements
The protection requirements I had in mind were:
- Do not modify the statically generated website files; CloudFront itself would need to authenticate visitors before it served content.
- Zero costs where possible; stay within the free tier of the services used and falling back to paying per-request when needed.
- Restrict to native AWS services; services like Okta or Auth0 were out.
- All resources must be provisioned by Infrastructure-as-Code
CloudFront has two methods to support the first requirement; signed cookies and signed URLs. Signed URLs work best when you can predict which files hosted in S3 will be requested. For protecting an entire website, signed cookies are the best as they work across the entire distribution.
Designed Architecture
These are the AWS services I selected:
Cognito was selected for two main reasons:
- I did not want to reinvent the wheel by writing my own identity platform; and
- I have always wanted to learn more about Cognito (I succeed on this… more about Cognito later).
Below is the architecture I eventually came up with after spending waaay too many lunch breaks and weekends trying to figure out how to get it all playing together nicely:
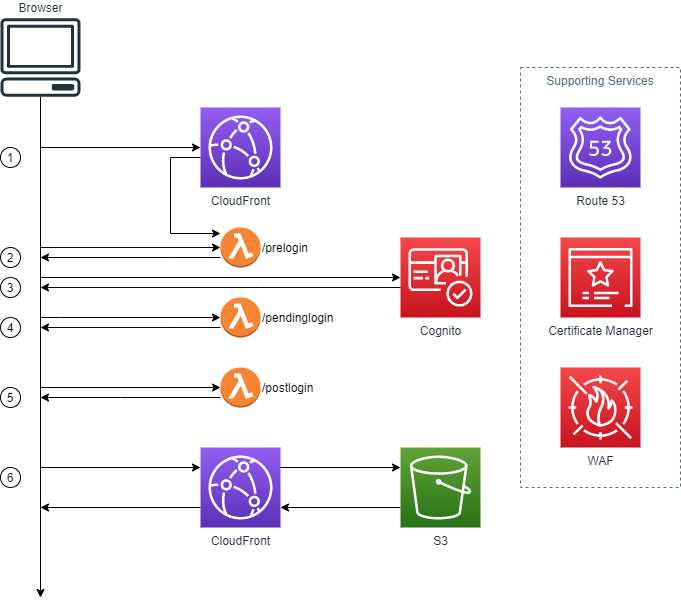
Protecting your website is a multi-hop process:
-
Hop one happens when your browser makes a request for any asset. Without signed cookies CloudFront raises a
403 Forbiddenstatus code which is intercepted by theCustomErrorResponseconfiguration below. TheCustomErrorResponsegenerates a customised HTML error page.CustomErrorResponses: - ErrorCode: 403 ResponseCode: 200 ResponsePagePath: '/prelogin' -
The contents of the custom HTML error page include a meta refresh tag in the HTML
<head>to redirect to Cognito. This is unfortunately required as you cannot configureCustomErrorResponseto natively redirect to another URL. The meta tag looks like:<meta http-equiv="refresh" content="0; URL={cognito-url}" /> -
The browser makes a call to Cognito using a URL that looks like this:
https://${CognitoUserPoolDomain}.auth.ap-southeast-2.amazoncognito.com/login?client_id=${CognitoUserPoolClient}&response_type=token&scope=email+openid+profile&redirect_uri=https://${DomainName}/pendinglogin, where:CognitoUserPoolDomainis the User Domain IdCognitoUserPoolClientis the User Pool Client Id; andDomainNameis the CloudFront domain name we navigate to after successfully authenticating the user.
-
Once the user has successfully authenticated, Cognito redirects back to
/pendinglogin. This unfortunate hop is required as Cognito will only return the JWT as a browser fragment (i.e., the part of the URL after a#). Fragments are never sent to the server, so this page grabs the fragment and turns it into a query string for/postlogin. -
/postloginreads the JWT from the query string, validates it and then generates the CloudFront signed cookies. The cookies are then returned through another redirect to ‘/’ to load the main page. -
We are back to the start now, but with signed cookies. CloudFront serves the website content now the signed cookies are sent with every request.
Additional supporting services:
- Route 53 can be integrated to give the CloudFront distribution a friendly DNS name.
- Certificate Manager can be integrated, after configuring a friendly DNS name, to give the CloudFront distribution a TLS certificate.
- Web Application Firewall can be integrated to add in additional protection. This is not required if the content being served is simple static web assets.
Cognito, the Best and Worst of Times
To be blunt: the Cognito documentation is very unfriendly for newbies (like me) to navigate. I had a terrible time trying to combine learning OAuth, understanding Cognito and having an unorthodox use-case (no, I do not want to use AWS Amplify. I eventually muddled my way through and got a working project. The snippets below outline the decisions I made to integrate Cognito.
UserPool
A Cognito User Pools operates as the directory containing all the users… aka a pool of users 😎
AccountRecoverySetting:
  RecoveryMechanisms:
    - Name: verified_email
      Priority: 1
Specifies how a user can recover their forgotten password. Since I automatically verify the user’s email address on sign-up, it is the only option I needed to configure.
AdminCreateUserConfig:
  AllowAdminCreateUserOnly: false
  InviteMessageTemplate:
    EmailSubject: !Ref ParamInviteMessageSubject
    EmailMessage: !Ref ParamInviteMessageBody
This setting controls the ability for visitors to sign-up themselves (by setting AllowAdminCreateUserOnly to false). While I had no need to do this, you can pair this with a Lambda function to restrict sign-ups to your corporate domain.
AutoVerifiedAttributes:
  # email and/or phone_number
  - email
I could not find any documentation on this, so my interpretation is: specify email and a verification email is sent the user to verify the email address.
DeviceConfiguration:
  ChallengeRequiredOnNewDevice: true
  DeviceOnlyRememberedOnUserPrompt: true
I could not work out what this relates to (though by the names I think I can extrapolate) … so I picked ‘safe’ values and hoped for the best. Seems ok so far…
EmailConfiguration:
  # COGNITO_DEFAULT | DEVELOPER
  EmailSendingAccount: COGNITO_DEFAULT
This one I do understand as it controls the method for sending emails. COGNITO_DEFAULT is the quicker option as it uses Cognito’s internal email sending process. This has restrictions that do not apply to my use case. Switch it to DEVELOPER and Cognito uses your account’s SES configuration, needed for production-level email sending.
Policies:
  PasswordPolicy:
    MinimumLength: 8
    RequireLowercase: true
    RequireNumbers: true
    RequireSymbols: true
    RequireUppercase: true
    TemporaryPasswordValidityDays: 1
Pretty simple this one, no docs required.
UserPoolClient
A User Pool Client (aka App Client) provides the Hosted UI for your User Pool. This is needed as the protected application does not provide its own sign-up/login experience.
AccessTokenValidity: 12
How long, in hours, will the JWT to be valid for. 12 hours seems like a useful duration.
AllowedOAuthFlows:
  # implicit | code | client_credentials
  - implicit
AllowedOAuthFlowsUserPoolClient: true
AllowedOAuthScopes:
  # 'phone' is also allowed
  - profile
  - email
  - openid
ExplicitAuthFlows:
  # Other allowed values:
  #   ALLOW_ADMIN_USER_PASSWORD_AUTH
  #   ALLOW_CUSTOM_AUTH
  #   ALLOW_USER_SRP_AUTH
  - ALLOW_USER_PASSWORD_AUTH
  - ALLOW_REFRESH_TOKEN_AUTH
These values came about through trial-and-error (mostly error). Values for AllowedOAuthScopes and ExplicitAuthFlows started out with email and ALLOW_USER_PASSWORD_AUTH respectively and grew as I encountered error after error.
Same for AllowedOAuthFlows; I tried all combinations before settling with implicit.
CallbackURLs:
  - !Sub 'https://${DomainName}/pendinglogin'
  - !Sub 'https://${DomainName}/logout'
DefaultRedirectURI: !Sub 'https://${DomainName}/pendinglogin'
LogoutURLs:
  - !Sub 'https://${DomainName}/logout'
A bit awkward to see, these are the various URLs that Cognito will callback/redirect to. The URI /pendinglogin is used once the user can successfully authenticated themselves (it is where the JWT is delivered to).
Pre, Pending and Post Logging in
Discuss /prelogin
The /prelogin Lambda function has one purpose; to redirect users to the Cognito login page. To keep it reusable, the Cognito URL and CORS domain are both read from Parameter Store.
export async function handler(_event: APIGatewayProxyEvent, _context: Context): Promise<APIGatewayProxyResult> {

  const idpRedirectionUrl = await retrieveParameter(IDP_REDIRECTION_URL);
  const domain = await retrieveParameter(IDP_REDIRECTION_DOMAIN);

  return {
    'statusCode': 200,
    'headers': {
      'Access-Control-Allow-Origin': `https://${domain}`,
      'Content-Type': 'text/html',
    },
    body: `...snip...`
  };

};
The generated HTML is also suitably sparse; a meta refresh directive and some controls to restrict caching. If I were to deploy this on a semi-popular website, I would reconsider my caching decisions here.
<!DOCTYPE html>
<html>
  <head>
  <title>DEMO - Sign-in Redirection</title>
  <meta http-equiv="refresh" content="0; URL=${idpRedirectionUrl}" />
  <meta http-equiv="cache-control" content="no-cache, no-store, must-revalidate" />
  <meta http-equiv="pragma" content="no-cache" />
  <meta http-equiv="expires" content="0" />
</head>
<body>
</body>
</html>
Why didn’t I just store the HTML directly in an S3 Bucket? Good question! I could have, except that I like the control to dynamically calculate the response if I ever need to in the future.
Discuss /pendinglogin
/pendinglogin only exists as a work around to pass the JWT to Cognito from the CloudFront distribution. Remember after; the JWT is returned in the browser fragment rather than the query string. The function returns an HTML page containing JavaScript which extracts the fragment and attaches it as the query string on the call to /postlogin. Before you ask, yes this could also have just been an HTML page in an S3 Bucket 😆
export async function handler(_event: APIGatewayProxyEvent, _context: Context): Promise<APIGatewayProxyResult> {

    const domain = await retrieveParameter(IDP_REDIRECTION_DOMAIN);

    return {
        'statusCode': 200,
        'headers': {
            'Access-Control-Allow-Origin': `https://${domain}`,
            'Content-Type': 'text/html',
        },
        body: `<!DOCTYPE html>
<html>

<head>
    <title>DEMO - Pending Login</title>
    <meta http-equiv="cache-control" content="no-cache, no-store, must-revalidate" />
    <meta http-equiv="pragma" content="no-cache" />
    <meta http-equiv="expires" content="0" />
</head>

<body>
    <script lang="javascript">

        const protocol = 'https://'
        const hostname = window.location.hostname;
        const pathname = '/postlogin';
        const fragment = window.location.hash.substr(1);
        window.location.assign(protocol + hostname + pathname + '?' + fragment);
    </script>
</body>
</html>
`
    };

};
Discuss /postlogin
This function definitely can’t be an HTML file; it performs all the signed cookie goodness. The steps it follows are:
- Confirm that the token is a validly signed JWT from our Cognito instance.
- Retrieves both the public and private CloudFront keys.
- Generate a custom signer policy and then sign it.
- Add redirection headers, including
Access-Control-Allow-Credentialswhich specifies that it is ok to return credentials. - Add the three signed cookie headers.
- Finally send the headers and a
307 Temporary Redirectto the main page.
export async function handler(event: APIGatewayProxyEvent, _context: Context): Promise<APIGatewayProxyResult> {

  const cognitoIssuer = await retrieveCognitoIssuer();
  // Step 1
  const validatedJwt = await verifyJwt(cognitoIssuer, event.queryStringParameters['id_token']);

  if (validatedJwt.isValid) {
    const domain = await retrieveParameter(IDP_REDIRECTION_DOMAIN);
     // Step 2
    const keyPairId: string = await retrieveParameter(CLOUDFRONT_KEY_PAIR_ID);
    const privateKey: string = await retrieveSecret(CLOUDFRONT_PRIVATE_KEY);
    // Step 3
    const options: Signer.SignerOptionsWithPolicy = { policy: `{"Statement": [{"Resource": "https://${domain}/*","Condition": {"DateLessThan": {"AWS:EpochTime":${validatedJwt.expiryInSeconds}}}}]}` };
    const cookies: Signer.CustomPolicy = new Signer(keyPairId, privateKey).getSignedCookie(options);

    const headers = {
      // Step 4
      'Access-Control-Allow-Credentials': true,
      'Access-Control-Allow-Origin': `https://${domain}`,
      'Location': `https://${domain}/index.html`,
      // Step 5
      'SET-Cookie': `CloudFront-Key-Pair-Id=${cookies["CloudFront-Key-Pair-Id"]};Domain=${domain};Path=/;Secure;HttpOnly`,
      'Set-Cookie': `CloudFront-Policy=${cookies["CloudFront-Policy"]};Domain=${domain};Path=/;Secure;HttpOnly`,
      'set-Cookie': `CloudFront-Signature=${cookies["CloudFront-Signature"]};Domain=${domain};Path=/;Secure;HttpOnly`,
    };

    return {
      statusCode: 307,
      headers,
      body: undefined
    };
  }

  console.error(JSON.stringify(validatedJwt));

  throw new Error(validatedJwt.error.message);
}
Pain and Agony
From what I assumed would be a smooth and easy road, I hit every bump and pothole along the way before getting everything deployed and running. This also included a one major detour that stopped at a dead end. Since misery shared is misery doubled (that’s how that saying goes, right?) here are the painful bits my brain lets me remember.
The Cognito documentation is complete…. just not for my use-case which was to protect resources hosted in CloudFront without resorting to embedding client-side code in my webpages. Maybe this is partly on me; the documentation is geared towards what you can do and not why or how. I’m not an OAuth expert; maybe if I were, I could follow along. I searched multiple times for tutorial docs for both Cognito and OAuth without luck. Final Cognito gripe; there are NO useful docs on how to use the hosted Cognito UI. I managed to cobble together enough bits from the AWS Console to make it work.
Speaking of consoles, this brings me to my second whinge; Amplify. I get it, it’s the “Way of the Future!” … except I cannot (or really did not want to) embed it within my generated webpages. All the Cognito tutorials I found kept ramming Amplify down my throat. Again, this would be fine if I were using a rich client written in React or Angular.
Once I finally bashed everything into rough alignment, I hit the big detour. I initially started using the implicit OAuth flow to receive the JWT token from Cognito. Unfortunately (for my use-case) the JWT can only be sent back via a browser fragment (which is the bit after the # in URLs like http://example.com#this-is-the-fragment). My research led me to believe that this is not an issue with Cognito as it is a standard implementation feature of OAuth. It immediately became an issue as I do not have client-side JavaScript to consume the fragment. This required a dodgy workaround where I serve up the /pendinglogin page to just convert the fragment into a query-string and then send it to the /postlogin lambda function. The ‘correct’ and alternative approach would be to use the code OAuth flow, except that no matter what I tried I just could not get it to work.
The last hurdle was a stupid user problem where I just could not get CloudFront to accept the signed cookies the /postlogin function was generating. I read and re-read the documentation, switch signing libraries and alternated between canned and custom policies. Nothing seemed to get them to work. Then I stumbled across the problem. Turns out that "123" is interpreted differently to 123 in the custom policy! You can see this in the example policy below. Even though the AWS:EpochTime contains a number, the fact it is wrapped in double quotes means that it is not interpreted correctly, and the signed cookies are rejected.
{
  "Statement": [
    {
      "Resource": "https://d12abcde3f4ghi.cloudfront.net/*",
      "Condition": {
        "DateLessThan": {
          "AWS:EpochTime": "1607767930"
        }
      }
    }
  ]
}
Demo Time and Wrap Up
When I commenced down this path, the outcomes I wanted to achieve were:
- A better understanding of Cognito and protecting CloudFront through signed cookies.
- A blog post describing my journey.
- A GitHub repository that I could share with the world to help others facing the same challenge.
This post covers the first two points; and for the last a GitHub repo can be viewed here. The repo contains detailed instructions for deploying a complete example into your own AWS account.
Having started down this learning path, it became a personal challenge to complete. There were times when I wanted to chuck it all in and investigate something else. My stubborn streak fuelled me to keep going so that someone else in the same situation does not have to experience the same pain I did. I am really happy with the finished repo and hope you find it useful too!