4 minutes
CloudFormation all the way down - With Code!
Introduction
For those who have been follow my “CloudFormation all the way down” series, CONGRATULATIONS! You have made it to the final instalment. If you haven’t been following along, please head back to the beginning. I’ll wait 😉
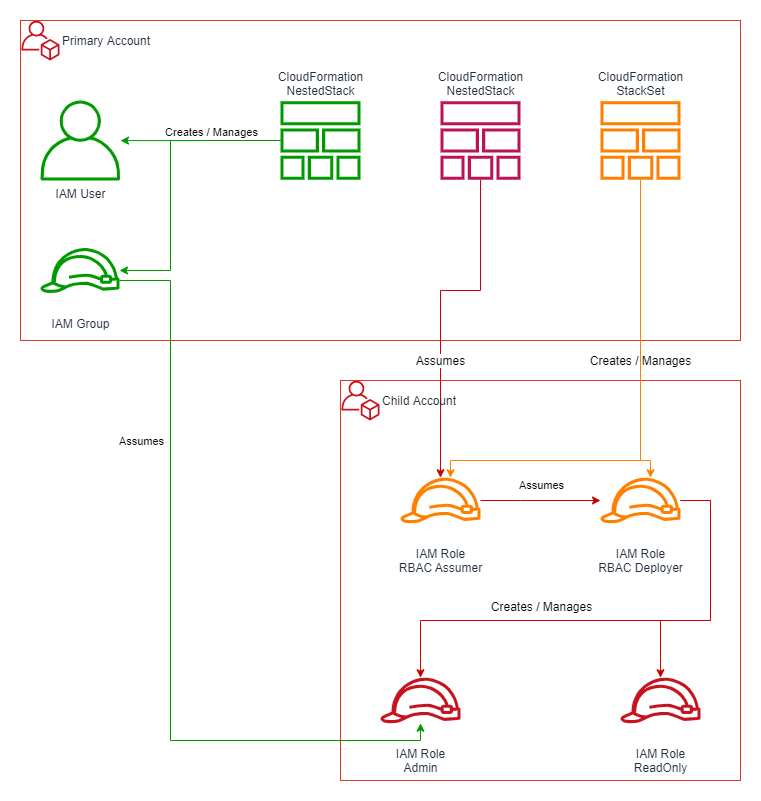
This final instalment expands the Approach section from the previous post with a simple implementation in CloudFormation. The code models an approach using two AWS accounts (a primary account and a child account) and two IAM roles (Admin and ReadOnly).
Implementation
Child Account
The initial step is to create a YAML file for each AWS account. I recommend using a naming prefix like infrastructure/iam_rbac_account_<account-name>.yml. This helps keep related files together (alternatively you can use folder structures, whichever works best 😄)
$ ls -l iam_rbac_account*
-rw-r--r-- 1 Pete 197121 1289 Nov  3 20:04 iam_rbac_account_child1.yml
-rw-r--r-- 1 Pete 197121 3370 Nov  5 12:20 iam_rbac_account_primary.yml
Following closely behind is identifying the generic job functions. Again, these are implemented as YAML files, and will be referenced from the account YAML files:
$ ls -l iam_rbac_jf*
-rw-r--r-- 1 Pete 197121  1255 Oct 26 20:56 iam_rbac_jf_administrator.yml
-rw-r--r-- 1 Pete 197121 15541 Oct 26 20:56 iam_rbac_jf_readonly.yml
Note: My job functions do not mirror good practices. You will want more fine-grained job functions rather than full-permission administrators and a limited read-only users.
Once you have the job functions defined, open infrastructure/iam_rbac_account_child1.yml and add in a stanza like the below:
AWSTemplateFormatVersion: 2010-09-09

Parameters:
  ...snipped for brevity

Resources:

  Administrator:
    Type: AWS::CloudFormation::Stack
    Properties:
      Parameters:
        ParamPrimaryAccountId : !Ref ParamPrimaryAccountId
        ParamAdministratorRoleName : !Ref ParamAdministratorRoleName
      TemplateURL: !Sub 'https://${ParamBucketName}.s3-${ParamBucketRegion}.amazonaws.com/infrastructure/iam_rbac_jf_administrator.yml'
      TimeoutInMinutes: 5 # If not specified then there is no timeout.

  ReadOnly:
    Type: AWS::CloudFormation::Stack
    Properties:
      Parameters:
        ParamPrimaryAccountId : !Ref ParamPrimaryAccountId
        ParamReadOnlyRoleName : !Ref ParamReadOnlyRoleName
      TemplateURL: !Sub 'https://${ParamBucketName}.s3-${ParamBucketRegion}.amazonaws.com/infrastructure/iam_rbac_jf_readonly.yml'
      TimeoutInMinutes: 5 # If not specified then there is no timeout.
The almost-final step is adding a CodePipeline Action to pipeline/aws_seed.yml which deploys into the child account:
  - Name: 'ChildAccount1'
    ActionTypeId:
      Category: Deploy
      Owner: AWS
      Provider: CloudFormation
      Version: '1'
    Configuration:
      ActionMode: REPLACE_ON_FAILURE
      Capabilities: CAPABILITY_NAMED_IAM
      ParameterOverrides: !Sub |
        {
          "ParamBucketName": "${CodePipelineBucket}"
          , "ParamBucketRegion": "${ParamBucketRegion}"
          , "ParamPrimaryAccountId": "${AWS::AccountId}"
          , "ParamAdministratorRoleName": "${ParamAdministratorRoleName}"
          , "ParamReadOnlyRoleName": "${ParamReadOnlyRoleName}"
        }
      RoleArn: !Sub "arn:aws:iam::${ParamChild1AccountId}:role/${ParamDeployerRoleName}"
      StackName: !Sub '${ParamPipelineName}-Rbac'
      TemplateConfiguration: 'CodeCommitSource::pipeline/resource_tags.json'
      TemplatePath: 'CodeCommitSource::infrastructure/iam_rbac_account_child1.yml'
    RoleArn: !Sub "arn:aws:iam::${ParamChild1AccountId}:role/${ParamAssumerRoleName}"
    InputArtifacts:
      - Name: 'CodeCommitSource'
Primary Account
Let’s switch over now and start configuring the Primary Account by opening infrastructure\iam_rbac_account_primary.yml.
First step is to create a new IAM User. The astute reader will notice that I’m using nested stacks again. This ensures that all IAM Users are created identically and that future changes are applied to every user automatically.
  IamUser:
    Type: AWS::CloudFormation::Stack
    Properties:
      Parameters:
        ParamUserName : 'RbacUser'
        ParamDefaultPassword : !Ref ParamDefaultPassword
      TemplateURL: !Sub 'https://${ParamBucketName}.s3-${ParamBucketRegion}.amazonaws.com/infrastructure/iam_rbac_iam_user.yml'
      TimeoutInMinutes: 5 # If not specified then there is no timeout.
By default, all IAM Users have zero permissions, which is great from a security standpoint but rather limiting. Let’s add the user to the self-management IAM Group which has a very limited suite of permissions:
  IamGroupAwsConsole:
    Type: AWS::CloudFormation::Stack
    Properties:
      Parameters:
        ParamGroupName: 'RbacAwsConsole'
        ParamCsvListOfUsernames:
          Fn::Join:
            - ','
            - - !GetAtt ['IamUser','Outputs.IamUserName']
      TemplateURL: !Sub 'https://${ParamBucketName}.s3-${ParamBucketRegion}.amazonaws.com/infrastructure/iam_rbac_iam_user_self_management.yml'
      TimeoutInMinutes: 5 # If not specified then there is no timeout.
Note: The user will need to reset their password on initial login and then immediately configure an MFA device. If they don’t, they will not be able to proceed. The IAM User will probably also need to log out and then back into the AWS Console.
The final step is to add the new user to one-or-more job functions. As always this is done by using nested stacks and an IAM Group assignment:
  IamGroupReadOnly:
    Type: AWS::CloudFormation::Stack
    Properties:
      Parameters:
        ParamGroupName: !Sub '${ParamReadOnlyRoleName}Group'
        ParamCrossAccountRoleName: !Ref ParamReadOnlyRoleName
        ParamChild1AccountId: !Ref ParamChild1AccountId
        ParamCsvListOfUsernames:
          Fn::Join:
            - ','
            - - !GetAtt ['IamUser','Outputs.IamUserName']
      TemplateURL: !Sub 'https://${ParamBucketName}.s3-${ParamBucketRegion}.amazonaws.com/infrastructure/iam_rbac_iam_group.yml'
      TimeoutInMinutes: 5 # If not specified then there is no timeout.
The Job Function / Group configuration grants just-enough permissions to perform the cross-account role assumption.
Conclusion
I’ve quickly stepped you through the major points in getting everything configured and deployed, with the full project here on GitHub. Please take a look; all comments, improvements and pull-requests will be gratefully received.
This brings us to the end of this series! I hope you have found these articles worthwhile and you have learnt something new along the way.